
Winter’s arrival brings cozy nights by the fireplace, but for RV owners, it also signals an important maintenance task: winterizing your travel trailer. Proper preparation protects your investment from freezing temperatures that can cause thousands of dollars in damage. This comprehensive guide walks you through every step of the winterizing process, ensuring your trailer emerges from storage ready for spring adventures.
What Does It Mean to Winterize a Travel Trailer?
What is winterizing, and why do RV owners do it?
Winterizing is the process of preparing your travel trailer’s plumbing system and interior to withstand freezing temperatures during storage. Think of it as putting your RV into a protective hibernation state. The primary goal involves removing water from all systems and replacing it with RV antifreeze to prevent freeze damage.
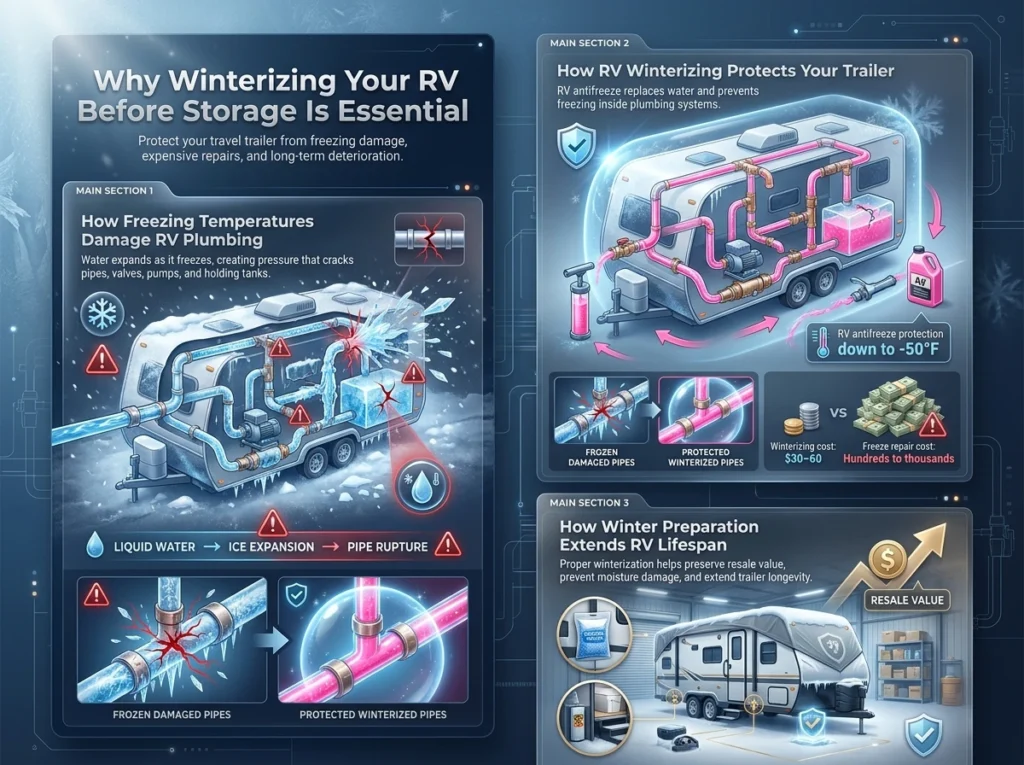
When water freezes, it expands by approximately 9%. In the confined spaces of RV pipes, this expansion creates immense pressure that cracks pipes, splits fittings, and damages water heaters, pumps, and holding tanks. Winterizing RV systems prevents these catastrophic failures by ensuring no water remains to freeze.
How does winterizing RV systems protect your plumbing and appliances?
Your travel trailer contains dozens of vulnerable points where water can collect: freshwater lines, drain pipes, the water heater, water pump, holding tanks, faucets, and the toilet. Each represents a potential failure point when temperatures drop below 32°F.
RV winterizing systematically addresses each component. By draining water tanks, clearing supply lines, and introducing antifreeze into the plumbing system, you create a protective barrier against freezing. The process also protects seals, gaskets, and valves that can deteriorate when frozen water expands against them.
What happens if you skip winterizing your travel trailer before cold weather?
Skipping winterizing your travel trailer invites disaster. Frozen water will crack PVC pipes, split metal fittings, damage the water pump’s internal components, and potentially rupture the water heater tank. Repairs for freeze damage typically cost $500-$3,000 or more, far exceeding the modest investment of time and materials required for proper winterization.
Beyond financial costs, freeze damage often remains hidden until you de-winterize in spring. You might discover leaks only after refilling systems, potentially causing water damage to floors, walls, and cabinetry. Prevention through proper winterizing saves money, time, and heartache.
Why Is Winterizing Your RV Important Before Winter Storage?
How do freezing temperatures damage RV plumbing and tanks?
RV plumbing systems are particularly vulnerable because they’re designed for portability, not cold-weather resilience. Unlike home plumbing, buried underground or within insulated walls, RV plumbing runs through thin-walled spaces with minimal insulation. When temperatures plummet, these exposed systems freeze rapidly — which is exactly why learning how to winterize a travel trailer before cold weather arrives is so critical.
The damage progression follows a predictable pattern. Water in pipes begins freezing, expanding, and creating pressure. That pressure exceeds pipe material strength, causing cracks or complete ruptures. Ice formation then damages seals, valves, and fittings. Water pumps sustain internal damage when frozen water prevents operation, and holding tanks crack when frozen contents expand against rigid walls. Every one of these failure points is preventable when you know how to winterize a travel trailer correctly and act before the first freeze hits.
Why does RV winterizing prevent cracked pipes and costly repairs?
Understanding how to winterize a travel trailer properly starts with understanding what winterizing actually does. The process works by eliminating the conditions that cause damage in the first place. RV antifreeze has a freezing point around -50°F — far below any temperature your stored trailer will realistically experience. When antifreeze fills your plumbing lines instead of water, freezing becomes essentially impossible.
The cost comparison makes the case clear. A quality RV winterizing kit costs $30–60 and takes one to two hours to use. Professional freeze damage repairs start at several hundred dollars and can exceed thousands if multiple systems fail simultaneously. Knowing how to winterize a travel trailer yourself is one of the most cost-effective maintenance skills any RV owner can develop, and the modest investment prevents genuinely catastrophic expenses down the line.
How does winter preparation extend the life of your travel trailer?
Proper travel trailer winterization extends well beyond plumbing protection alone. The complete process of understanding how to winterize a travel trailer addresses moisture control, pest prevention, and exterior protection — all factors that directly affect your trailer’s long-term condition and longevity. Trailers that undergo thorough annual winterization consistently maintain better overall condition, retain higher resale values, and deliver reliable service for decades. It isn’t just a seasonal chore; it’s a long-term investment in your RV’s lifespan.
When Should You Winterize a Travel Trailer?
What temperature signals it’s time to winterize an RV?
The golden rule for how to winterize a travel trailer on the right schedule is straightforward: complete the process before temperatures drop to 32°F or below, even for a single night. Many experienced RV owners recommend starting when nighttime temperatures consistently fall into the 35–40°F range, providing a comfortable safety buffer before the first hard freeze arrives.
Don’t wait for weather forecasts predicting freezes before you begin winterizing your travel trailer. Unexpected cold snaps can arrive suddenly, especially during transitional seasons when conditions shift fast. Starting the travel trailer winterization process early costs nothing extra but provides genuine peace of mind throughout the storage period.
Why is early preparation better than waiting for freezing weather?
Early preparation offers several real advantages when it comes to how to winterize a travel trailer effectively. Working in moderate temperatures is far more comfortable than rushing through the process in bitter cold. Supply availability is also better — waiting until everyone else panics about an incoming freeze often means facing sold-out RV winterizing kits at local stores, which can delay your entire winterization timeline.
There’s another important benefit: completing travel trailer winterization early gives you time to catch any maintenance issues before storage. If you discover a problem while working through how to winterize a travel trailer, you have the time and space to address it properly before spring, rather than scrambling to fix it when camping season is already underway.
Q: How do climate and location affect the winterizing timeline?
Location dramatically affects when and how to winterize a travel trailer in practice. Southern states might not need full RV winterization until late November or December, while northern regions should complete the process by late September or early October. Mountain areas face freeze risks even earlier and often require the earliest attention to travel trailer winterization of any region.
Your specific storage location matters too. RVs stored in heated facilities might not need full travel trailer winterizing, though many owners still complete the process as insurance against unexpected heating failures. Wherever you store your trailer, building a consistent annual habit around how to winterize a travel trailer is always the smarter long-term approach.
What Tools and Supplies Do You Need to Winterize a Travel Trailer?
What comes in a typical RV winterizing kit?
A standard RV winterizing kit contains essential components for the process:
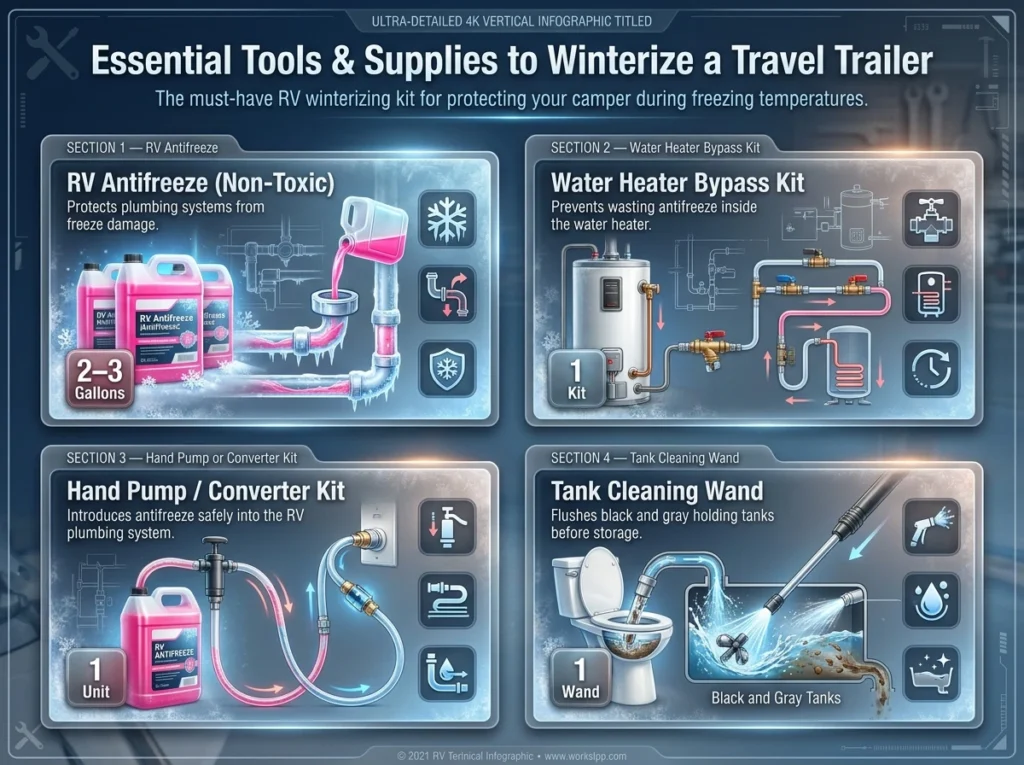
| Item | Purpose | Typical Quantity |
| RV Antifreeze (non-toxic) | Protects plumbing from freezing | 2-3 gallons |
| Water heater bypass kit | Prevents wasting antifreeze | 1 kit |
| Hand pump or converter kit | Introduces antifreeze to the system | 1 unit |
| Wand for tank cleaning | Flushes black/gray tanks | 1 wand |
Why do many travelers use a camper winterizing kit for convenience?
Camper winterizing kits bundle everything needed in one package, eliminating guesswork about quantities or components. Convenience matters when you’re preparing for storage—you don’t want to discover you’re missing crucial supplies halfway through the process.
Pre-assembled kits also ensure component compatibility. The included antifreeze matches the recommended type (propylene glycol-based, never automotive antifreeze), and pumps or converters fit standard RV systems.
When might a motorhome winterizing kit also work for travel trailers?
Motorhome winterizing kits and travel trailer kits are largely interchangeable since both vehicle types share similar plumbing systems. The main difference involves engine cooling systems in motorhomes, which travel trailers lack. If purchasing a motorhome kit for your travel trailer, you’ll simply skip engine-related steps.
Some motorhome kits include larger antifreeze quantities, which works fine—extra antifreeze stores for future use. Just verify the kit contains non-toxic RV antifreeze rather than automotive coolant.
Here is the content with the focus keyword “How to Winterize a Travel Trailer” naturally increased throughout, preserving full readability and flow:
How to Winterize a Travel Trailer Step by Step
How do you properly winterize a travel trailer from start to finish?
Knowing how to winterize a travel trailer correctly means following a specific sequence designed to thoroughly protect all water systems. Rushing or skipping steps compromises that protection — and one missed step can mean hundreds of dollars in spring repairs. Set aside one to two hours for the complete travel trailer winterization process, working methodically through each stage.
How Do You Turn Off and Cool the RV Water Heater?
Why is shutting off the water heater the first winterizing step?
The very first step in how to winterize a travel trailer is turning off the water heater and allowing it to cool completely. Hot water can cause burns during draining and may affect antifreeze performance. Most RV water heaters require 30 to 60 minutes to cool after shutting off power.
This step also prevents accidentally heating an empty tank later in the travel trailer winterizing process, which can damage the heating element. Mark your calendar or set a timer — trying to work with a hot water heater while winterizing a travel trailer leads to delays and potential injuries.
How Do You Remove Water Filters and Prepare the Plumbing System?
Q: Why should filters be removed before winterizing RV plumbing?
Before moving further into how to winterize a travel trailer, remove all water filters from the system. Antifreeze can damage filter media and reduce their long-term effectiveness. Filters also restrict flow, making it harder to completely clear water from the plumbing during the RV winterization process.
Store removed filters in a clean, dry location. Mark your calendar to replace them during spring de-winterization — you don’t want to reinstall used filters that have sat for months after winterizing your travel trailer.
How Do You Drain the Gray and Black Water Tanks?
How do empty tanks prevent freezing and unpleasant odors?
A critical part of how to winterize a travel trailer is draining both gray and black water tanks completely at an approved dump station. Empty tanks eliminate freezing risks and prevent foul odors from developing throughout the storage period. Any remaining liquid can freeze, expand, and crack tank walls — exactly the kind of damage that thorough travel trailer winterization is designed to prevent.
After draining, flush both tanks thoroughly with clean water. Add a cup of RV antifreeze to each tank after draining to protect the drain valves and guard against any residual water freezing during the coldest months.
How Do You Drain the Freshwater Tank and Low-Point Drains?
Why does clearing standing water protect RV pipes in cold temperatures?
This stage of how to winterize a travel trailer requires locating and opening every drain point in the freshwater system. That includes the freshwater tank drain valve, usually located under the trailer; the low-point drains for both hot and cold water lines; and the water heater drain plug, which should be removed completely to allow air circulation.
Open all faucets — both hot and cold — to allow air into the system. This airflow helps water drain more completely and speeds up one of the most important steps in the entire travel trailer winterizing sequence. Gravity does most of the work, but the air exchange makes a meaningful difference in how thoroughly the system clears.
How Do You Bypass the Water Heater?
How does bypassing prevent wasting antifreeze during RV winterizing?
Most RV water heaters hold six to ten gallons. Without a bypass in place during travel trailer winterization, you would need to fill that entire volume with antifreeze — expensive, wasteful, and unnecessary. A water heater bypass valve routes plumbing around the tank, allowing antifreeze to protect supply lines without flooding the heater itself.
Bypass valves come in different configurations — three-valve or single-valve systems. Consult your owner’s manual for your specific setup before proceeding. Understanding your bypass configuration is one of the more equipment-specific aspects of how to winterize a travel trailer, but the actual process typically takes just a few minutes once you know which valves to turn.
How Do You Add RV Antifreeze to the Plumbing System?
What type of antifreeze works best for winterizing an RV?
Choosing the right antifreeze is non-negotiable when learning how to winterize a travel trailer safely. Use only non-toxic, propylene glycol-based RV antifreeze specifically designed for potable water systems. Never use automotive antifreeze — ethylene glycol is highly toxic and can permanently contaminate your water system, making it unsafe long after the travel trailer winterization is complete.
RV antifreeze is available in different temperature ratings. For most climates, -50°F protection is the standard and is more than sufficient. You’ll typically need two to three gallons for a travel trailer winterizing job, though larger units may require more.
Two methods are used to introduce antifreeze during how to winterize a travel trailer. The hand pump method involves inserting a tube into an antifreeze jug, connecting it to the water intake, and manually pumping antifreeze through the system. The water pump method pours antifreeze directly into the freshwater tank and uses the RV’s own pump to circulate it — though this is less common due to the difficulty of fully draining the tank afterward.
How Do You Run Antifreeze Through Faucets and Plumbing Lines?
How does this step protect sinks, showers, and toilets?
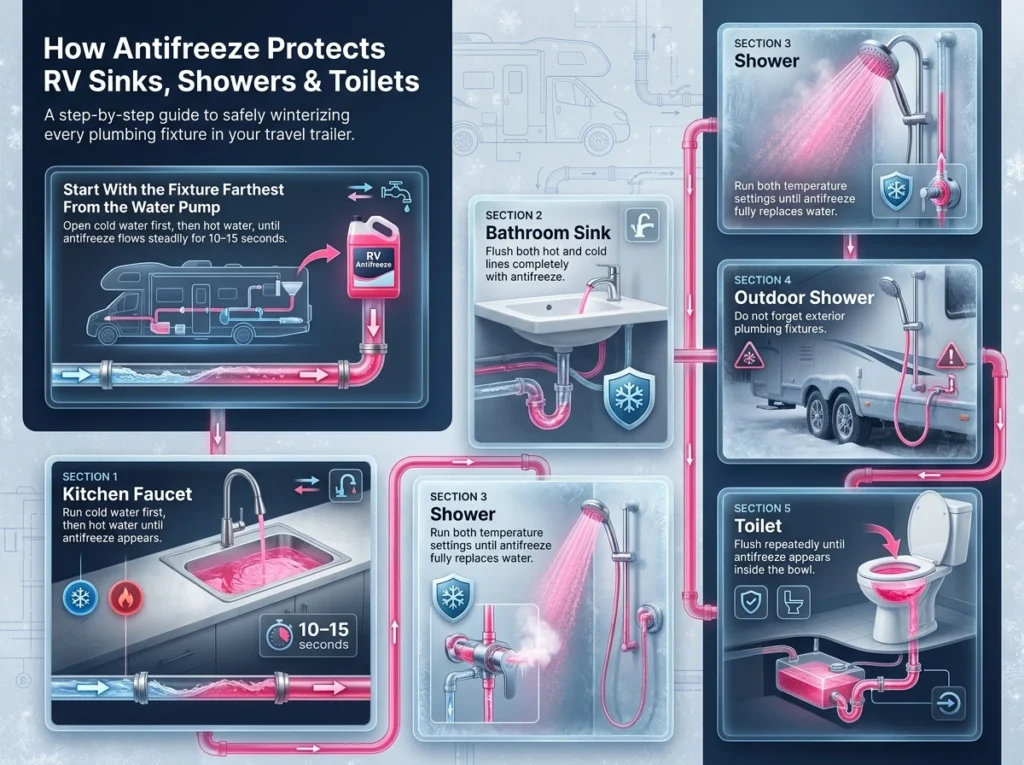
This is the most hands-on stage of how to winterize a travel trailer and the one that directly protects every fixture in the rig. Starting with the fixture farthest from the water pump, open each faucet — cold side first, then hot — until antifreeze flows out. You’ll see the water shift to the characteristic pink or blue color of RV antifreeze. Once antifreeze runs steadily for 10 to 15 seconds, close the faucet and move on.
Work systematically through every fixture as part of your complete travel trailer winterization: the kitchen faucet on both cold and hot settings, the bathroom sink on both settings, the shower on both settings, the outdoor shower if your unit has one, and finally the toilet — flush until antifreeze appears clearly in the bowl.
This sequence ensures antifreeze fills every supply line in the trailer, giving your plumbing complete protection throughout winter. Skipping even one fixture leaves a vulnerable point in an otherwise thorough travel trailer winterizing job — and that single gap is all it takes for freeze damage to occur.
How Do You Run Antifreeze Through Faucets and Plumbing Lines?
How does this step protect sinks, showers, and toilets?
Starting with the fixture farthest from the water pump, open each faucet (cold first, then hot) until antifreeze flows out. You’ll see water change to the pink or blue color of antifreeze. Once antifreeze runs steadily for 10-15 seconds, close the faucet and move to the next fixture.
Work systematically through:
- Kitchen faucet (cold, then hot)
- Bathroom sink (cold, then hot)
- Shower (cold, then hot)
- Outdoor shower (if equipped)
- Toilet (flush until antifreeze appears in the bowl)
This process ensures antifreeze fills all supply lines, protecting them throughout winter.
Why Should You Add Antifreeze to Drains and P-Traps?
How does this prevent frozen water in hidden plumbing areas?
P-traps under sinks and in shower drains hold water that prevents sewer gases from entering your RV. During winterizing, this trapped water can freeze and crack the traps.
Pour about a cup of RV antifreeze directly down each drain. This simple step protects p-traps that won’t be reached by circulating antifreeze through supply lines. Don’t forget the shower drain—it’s easy to overlook but equally vulnerable to freeze damage.
How Do You Prepare the RV Interior Before Winter Storage?
Why Should You Remove Food and Perishable Items?
How does leftover food attract pests during storage?
Even sealed packages can attract mice, insects, and other pests during long-term storage. Rodents can smell food through packaging and will chew through cabinets, walls, and containers to reach it. The damage from pest infestations often exceeds the value of food left behind.
Remove all food items, including:
Canned goods (which can freeze and burst) • Dry goods in cardboard or plastic packaging • Pet food and treats • Cooking oils and condiments • Any items with food odors
Clean all food storage areas thoroughly, vacuuming crumbs and wiping surfaces. This eliminates odors and food particles that attract pests.
How Can You Prevent Rodents and Insects in Your RV?
What are simple methods to keep pests away while your RV sits unused?
Preventing pest intrusions requires multiple strategies:
Physical Barriers: Seal potential entry points with steel wool or copper mesh. Mice can squeeze through openings as small as a dime. Check furnace vents, plumbing penetrations, and access panels.
Deterrents: Place dryer sheets, peppermint oil-soaked cotton balls, or commercial rodent deterrents throughout the RV. Mice dislike these scents and often avoid areas where they’re present.
Traps: Set snap traps or humane catch-and-release traps as a last line of defense. Check them when you visit your stored RV.
What Exterior Maintenance Should You Do Before Storing a Travel Trailer?
How Do You Inspect Seals, Windows, and the Roof?
Why does sealing gaps protect against winter moisture?
Water intrusion during winter storage causes extensive damage—rotted walls, delaminated floors, and mold growth. Before storage, inspect all seals around windows, doors, vents, and roof seams. Look for cracks, gaps, or deteriorated caulking.
Re-seal any compromised areas with appropriate RV sealant. Different materials require different sealants (silicone, polyurethane, or butyl tape), so identify your RV’s construction materials before purchasing products.
Should You Clean and Protect the RV Exterior?
How does washing and covering the trailer help prevent damage?
Thoroughly wash your travel trailer before storage. Dirt, road salt, and organic matter left on the exterior can cause staining, oxidation, and seal degradation during the winter months. A clean exterior also makes it easier to spot damage or issues.
After washing and drying, apply a quality RV wax or protective coating. This creates a barrier against moisture, UV rays, and contaminants. Even if you plan to use a cover, this protection layer safeguards your trailer.
How Can You Control Moisture and Prevent Mold in Your RV?
Why does moisture buildup happen during winter storage?
Temperature fluctuations during winter create condensation inside your RV. Warm days cause interior air to hold moisture, which then condenses on cold surfaces during freezing nights. This cycle repeats throughout winter, creating conditions perfect for mold and mildew growth.
How do ventilation and moisture absorbers protect the interior?
Prevent moisture problems through two strategies:
Ventilation: Crack a roof vent and window slightly to allow air circulation. This lets moisture escape rather than condensing on surfaces. Even small openings make significant differences.
Moisture Absorbers: Place desiccant products like Damp Rid or silica gel packets throughout the RV. These absorb ambient moisture, reducing humidity levels. Position containers in cabinets, closets, and under beds—anywhere air circulation is limited.
What Is the Best Way to Store a Travel Trailer in Winter?
Should You Use an RV Cover During Winter Storage?
What are the benefits of weather protection for long-term storage?
Quality RV covers provide valuable protection against sun, rain, snow, and debris. They prevent UV damage to paint and decals, keep snow and ice from accumulating on the roof, and reduce the amount of cleaning needed in spring.
However, covers require proper installation. Poorly fitted or low-quality covers can trap moisture, rub against paint, causing damage, or tear in high winds. If using a cover, invest in a breathable, well-fitted model designed for your trailer size.
Where Is the Best Place to Store Your RV for Winter?
What should you consider when choosing between indoor and outdoor storage?
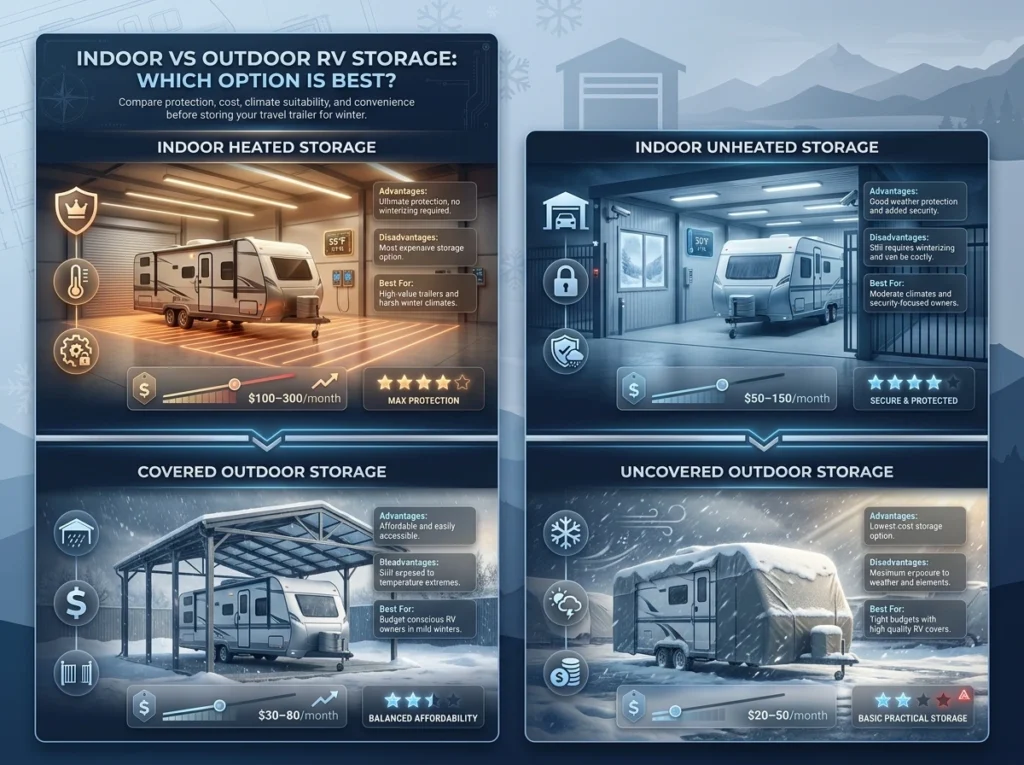
| Storage Type | Advantages | Disadvantages | Best For |
| Indoor Heated | Ultimate protection, no winterizing needed | Expensive ($100-300/month) | High-value trailers, harsh climates |
| Indoor Unheated | Weather protection, security | Still requires winterizing, costly | Moderate climates, security concerns |
| Covered Outdoor | Affordable, accessible | Exposed to temperature extremes | Budget-conscious, mild winters |
| Uncovered Outdoor | Cheapest option | Maximum exposure to elements | Tight budgets, excellent RV covers |
Choose based on your budget, climate, and trailer value. Even outdoor storage works fine with proper winterizing and a quality cover.
What Are the Most Common RV Winterizing Mistakes to Avoid?
What mistakes do RV owners commonly make when winterizing?
Avoid these frequent errors that compromise winter protection:
Forgetting Water Tanks: Failing to completely drain gray, black, and freshwater tanks leaves water that can freeze and cause damage.
Skipping Antifreeze in Lines: Running antifreeze through the system but not verifying it reaches all fixtures leaves vulnerable points that can freeze.
Waiting Too Long: Procrastinating until freezing weather arrives means rushing through the process or risking freeze damage before completion.
Using Wrong Antifreeze: Using automotive antifreeze instead of RV-specific non-toxic antifreeze contaminates the potable water system and creates health hazards.
Neglecting P-Traps: Forgetting to pour antifreeze down drains leaves water in p-traps that can freeze and crack.
Frequently Asked Questions
Can you winterize a travel trailer without antifreeze?
Is it possible to winterize without using antifreeze?
Yes, the “blow-out method” uses compressed air to force water out of plumbing lines instead of antifreeze. However, this method is less reliable—small amounts of water often remain in low points and trap areas. Most experts recommend antifreeze for complete protection, especially in harsh winter climates.
How long does it take to winterize an RV?
What’s the typical time required for winterizing?
Winterizing a travel trailer typically takes 1-2 hours for first-timers, decreasing to 45-60 minutes with experience. The process moves quickly once you understand the sequence. Factor in additional time for exterior cleaning, interior preparation, and maintenance tasks beyond basic plumbing protection.
Do you need a professional RV winterizing service?
Should you hire professionals or do it yourself?
Most RV owners can successfully winterize their own trailers using this guide. Professional services charge $75-150 and complete the job quickly, which might be worth it if you’re uncomfortable with the process or short on time. DIY winterization costs $30-60 in materials while teaching you valuable RV maintenance skills.
Can you use a motorhome winterizing kit for travel trailers?
Are motorhome and travel trailer winterizing kits interchangeable?
Yes, motorhome winterizing kits work perfectly for travel trailers. Both use identical plumbing systems and antifreeze. The only difference is that motorhomes have engine cooling systems requiring additional winterization steps that don’t apply to travel trailers—simply skip those sections.